Creating a policy step by step
The following section provides a guided example of how to create a basic policy in WinGate. We recommend that you read that rest of the policy help documentation first so that you are familiar with the concepts and terms used in this guide.
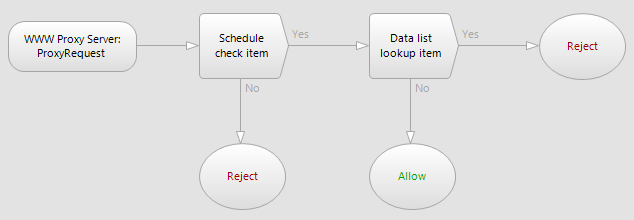
The example policy will be evaluated whenever someone makes a proxy request to the WWW Proxy service.
i.e. The policy is based on the WWWProxy:ProxyRequest event.

When this event happens, the policy will evaluate a Schedule check policy item to see if the proxy request is being made during work hours. If the request is outside of work hours, then the request is directed to a Result policy item configured to Reject the connection, and send an appropriate reject message to the client informing them that requests are not allowed to be made outside of work hours.
If the connection is inside work hours, the policy will then proceed to evaluate a Data list lookup policy item. This policy item will check to see if the URL in the clients Proxy request, matches one on a global data list called Blocked sites that has been previously created in the Data system in WinGate. If the URL matches an entry on the list, the policy evaluation is directed to a Result policy item that has been configured to Reject the connection, and send an appropriate reject message to the client informing them that the site they tried to access is blocked.
If the URL requested by the client doesn't match an entry on the Blocked sites global data list, the connection will be sent to a Result item configured to Allow, allowing the request to proceed and ending the policy evaluation.
The three main steps to the guide:
- Selecting the event that will trigger the policy.
- Adding and configuring the policy items that will make up the policy structure.
- Connecting the policy items to construct the policy flow chart.